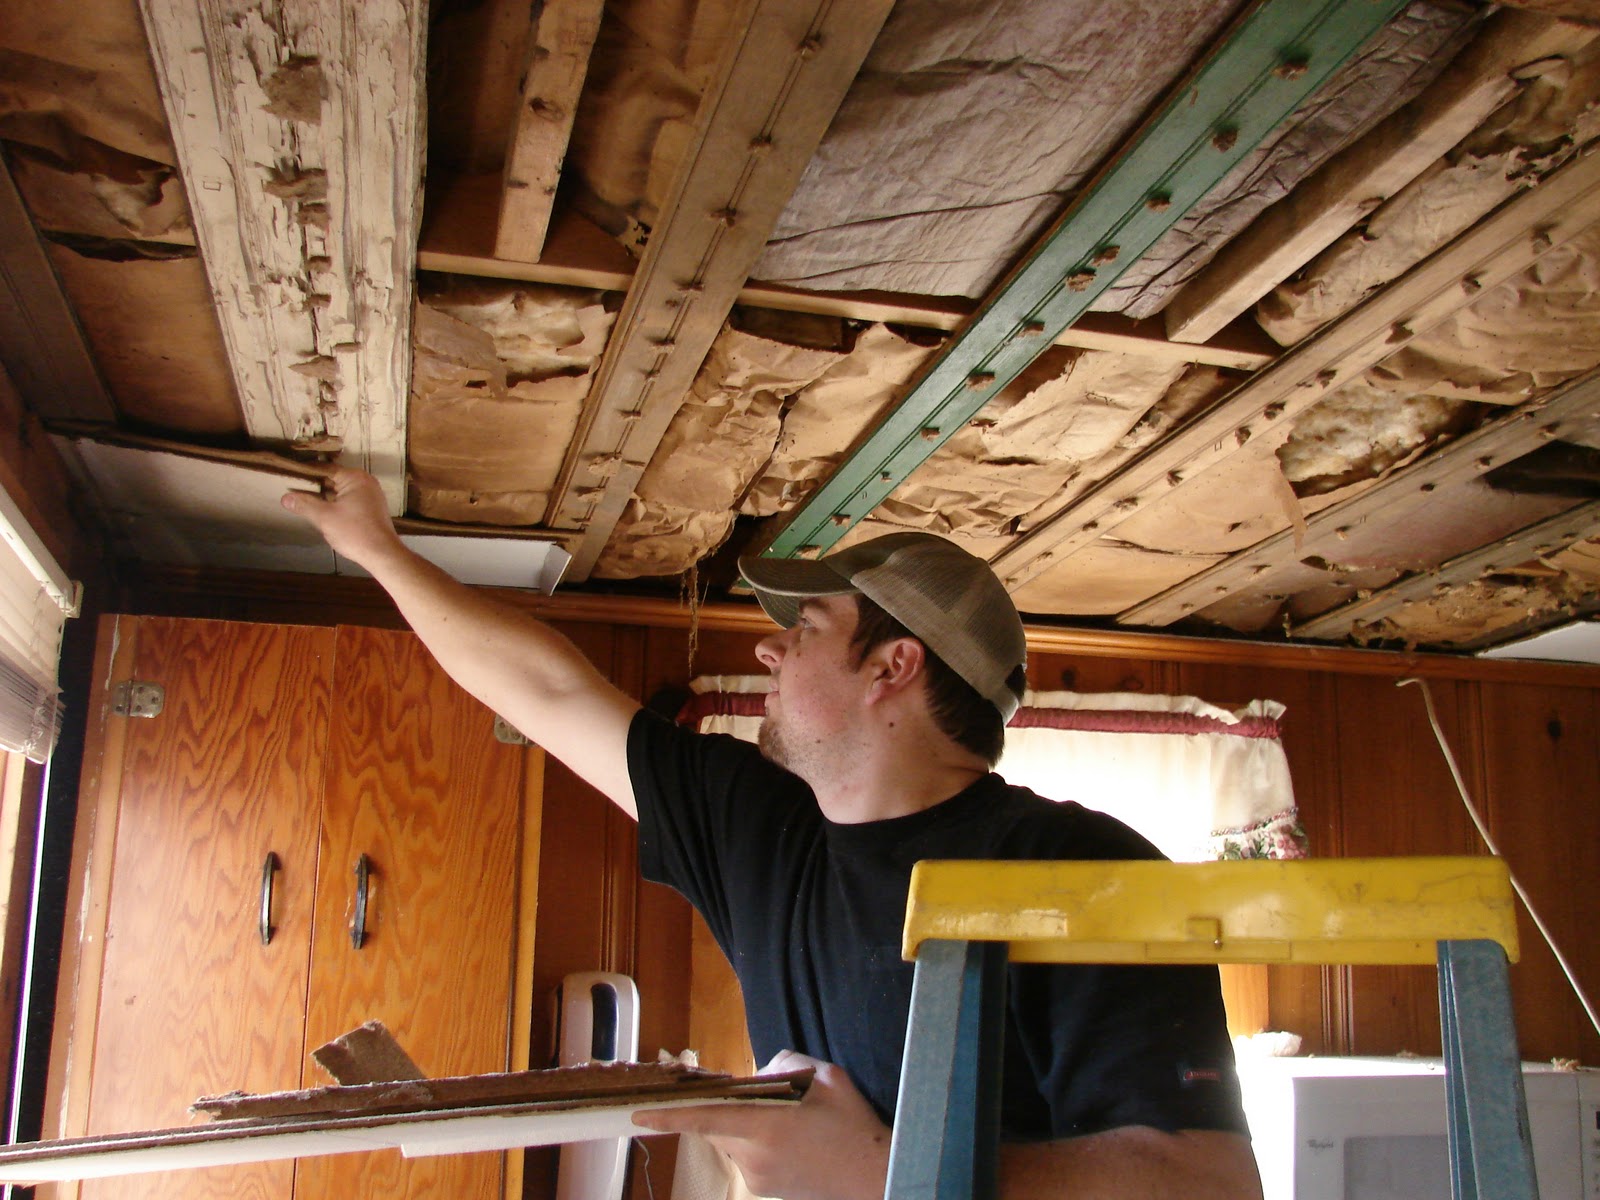
The back room is starting to progress; not quickly, but it is progressing. So I thought I would share some pictures of what it's looking like these days. So without further ado,
This is pretty much what it's looking like now.
The ceiling tiles are pretty much all down, there are a few stragglers though. They actually came down surprisingly easily in about an hour. Here's a Jake pulling some of the last ones down, they really just slipped right out.
And here's a look at our stack of ceiling tiles that we aren't quite sure how to get rid of ye. It's not like they are in good condition where we could just donate them to the Habitat for Humanity Re-Store or anything; eh, we'll figure something out.
As you may have noticed in the picture with Jake above though, the tiles left behind a slew of staples that had to be pulled.
The staples were spaced at least every inch, usually closer, and all had to be pulled so that we can hang sheet rock for the ceiling. Here's a look at one of the boards staple free and sheet rock ready.
So that's how the room is coming along so far. Next up is lighting. I can't wait for the room to have more than one sad little ceiling light and an old lamp. This room is gonna shine!
Monday, March 14, 2011
Saturday, March 12, 2011
Back Room Befores
So we've mentioned the back room renovation several times, but we haven't really explained why it needs renovated. You see, it's not that we're just reno happy over here (although sometimes that would be a true statement), but the back room is really in need of a lot of TLC. Caution, some pictures are quite disturbing, well, at least if you've had to live with it like this for several years. Here we go:
This is side of the room that we plan to use as a dining room/small reading area. That's our wonderful dining table and chairs covered up in the corner. At first glance it's not so bad, but just wait for it.
Here's a view of the other side of the room. That doorway on the left leads into the kitchen. And yes, the washer and dryer set up is very awkward. That's one of the things we're planning on fixing.
But the real problem that needs fixing is the ceiling.
You see, about four years ago the roof in the back room started to leak, and although it has since been re-roofed, the damage to the ceiling tiles has never been taken care of, and it's bad.
Although none of the ceiling tiles have ever got around to completely falling down, it doesn't exactly make for the most attractive room.This stain is our...favorite, if you could call a stain a favorite that is, because it looks like a brain and spinal scan to us.
Another feature of this room was the amount of screws/nails/randomness that was in the walls. You never had to put in a screw to hang anything up in this room, just look in the general area you want to hang something and you were most likely set.
We aren't quite sure what this little box thing and the stuff above it are, we think it might be some sort of switch or something.
All in all we removed 55+ nails/screws/randomness from the wall (we counted 55 originally, but then found more after we thought we were done). Here's a picture of the pile we removed:
So that's what's up with the back room renovation, and why we felt the need to tackle it. Some of our plans for the room are to tear down the ceiling, add more and better lighting, move the dryer over next to the washer, paint and take care of a few other things as well. We'll try to keep you pretty up-to-date on everything, but since we're doing it ourselves it's not moving at the speed of light, but it is coming along. I'll post early next week sometime with the progress thus far.
This is side of the room that we plan to use as a dining room/small reading area. That's our wonderful dining table and chairs covered up in the corner. At first glance it's not so bad, but just wait for it.
Here's a view of the other side of the room. That doorway on the left leads into the kitchen. And yes, the washer and dryer set up is very awkward. That's one of the things we're planning on fixing.
But the real problem that needs fixing is the ceiling.
You see, about four years ago the roof in the back room started to leak, and although it has since been re-roofed, the damage to the ceiling tiles has never been taken care of, and it's bad.
Although none of the ceiling tiles have ever got around to completely falling down, it doesn't exactly make for the most attractive room.This stain is our...favorite, if you could call a stain a favorite that is, because it looks like a brain and spinal scan to us.
Another feature of this room was the amount of screws/nails/randomness that was in the walls. You never had to put in a screw to hang anything up in this room, just look in the general area you want to hang something and you were most likely set.
We aren't quite sure what this little box thing and the stuff above it are, we think it might be some sort of switch or something.
All in all we removed 55+ nails/screws/randomness from the wall (we counted 55 originally, but then found more after we thought we were done). Here's a picture of the pile we removed:
So that's what's up with the back room renovation, and why we felt the need to tackle it. Some of our plans for the room are to tear down the ceiling, add more and better lighting, move the dryer over next to the washer, paint and take care of a few other things as well. We'll try to keep you pretty up-to-date on everything, but since we're doing it ourselves it's not moving at the speed of light, but it is coming along. I'll post early next week sometime with the progress thus far.
Monday, March 07, 2011
House Tour Part 2
Sorry it's taken a bit to get the second part of the house tour up, we've been working away on our back room renovation all weekend. Last Wednesday we took a look at the living room and kitchen and discussed the changes that have happened over the years to those two rooms. Today we're going to take a look at the bathroom and master bedroom. So to start things off:
This is our little bathroom. It's the only one in the house, and it's not very big, but it is quite functional, especially with a few alterations on our part.
Those two cabinets in the corner were added by us shortly after our wedding when I moved in and we obviously needed to do something about storage in here. The cabinets were from Bed, Bath & Beyond and we couldn't be happier with them. The lower one stores all our towels, toilet paper and the hair dryer, straightener, and curling iron, along with my make up. Yeah, it's a pretty hard working little cabinet. The top cabinet holds Jake's beard trimmer, some of my hair products and medicines and bandages. Those two cabinets are definitely life savers in our tiny bathroom because they take up so little space, but can hold quite a bit of stuff.
I think this is my favorite feature in our bathroom. Those towels were a wedding gift from some wonderfully thoughtful friends and that picture is one I took when I went to Taiwan in high school.
Two more things to point out in the bathroom before we move on to the bedroom. First is that our sink is a pedestal and that allows for more room in our dinky bathroom, so if you ever encounter a small bathroom I would definitely say that a pedestal is the way to go. Lastly, I want to point out our lovely floor. You may not think it's that lovely, but if you had seen the hideous old yellow laminate that was in there before you would think it looked like a completely new bathroom.
Now on to the master bedroom. Now let me dispel any grand ideas about a sprawling and spacious master bedroom that you may have right now. Our bedroom is the "master" simply because it is the bigger bedroom in the house, but that is where the "master" ends. There is no master bath connected to it, no grand closet, in fact, the closet is shared between the two bedrooms and set up more like a small hallway between the two rooms. So, now that we have the idea of a "master suite" out of your head,
Here's the "master" bedroom in all it's glory. The bedroom measures about 10.5 x 11.5.
The walls are coming across kind of pink in most of the pictures, the left hand side of this picture is probably the most accurate though, they are a nice camel tan color.
We plan to get new dressers some day, we just haven't gotten around to it yet. We'll probably use the longer dresser in the spare bedroom someday, but for now it's what we've got.
So that's it for the second part of the house tour. All that's left is the back room, which is currently in limbo, but we'll get up some before pictures for you soon, and the spare bedroom, which is currently storing stuff that we had to move up from the back room so that we could work back there.
This is our little bathroom. It's the only one in the house, and it's not very big, but it is quite functional, especially with a few alterations on our part.
Those two cabinets in the corner were added by us shortly after our wedding when I moved in and we obviously needed to do something about storage in here. The cabinets were from Bed, Bath & Beyond and we couldn't be happier with them. The lower one stores all our towels, toilet paper and the hair dryer, straightener, and curling iron, along with my make up. Yeah, it's a pretty hard working little cabinet. The top cabinet holds Jake's beard trimmer, some of my hair products and medicines and bandages. Those two cabinets are definitely life savers in our tiny bathroom because they take up so little space, but can hold quite a bit of stuff.
I think this is my favorite feature in our bathroom. Those towels were a wedding gift from some wonderfully thoughtful friends and that picture is one I took when I went to Taiwan in high school.
Two more things to point out in the bathroom before we move on to the bedroom. First is that our sink is a pedestal and that allows for more room in our dinky bathroom, so if you ever encounter a small bathroom I would definitely say that a pedestal is the way to go. Lastly, I want to point out our lovely floor. You may not think it's that lovely, but if you had seen the hideous old yellow laminate that was in there before you would think it looked like a completely new bathroom.
Now on to the master bedroom. Now let me dispel any grand ideas about a sprawling and spacious master bedroom that you may have right now. Our bedroom is the "master" simply because it is the bigger bedroom in the house, but that is where the "master" ends. There is no master bath connected to it, no grand closet, in fact, the closet is shared between the two bedrooms and set up more like a small hallway between the two rooms. So, now that we have the idea of a "master suite" out of your head,
Here's the "master" bedroom in all it's glory. The bedroom measures about 10.5 x 11.5.
The walls are coming across kind of pink in most of the pictures, the left hand side of this picture is probably the most accurate though, they are a nice camel tan color.
We plan to get new dressers some day, we just haven't gotten around to it yet. We'll probably use the longer dresser in the spare bedroom someday, but for now it's what we've got.
So that's it for the second part of the house tour. All that's left is the back room, which is currently in limbo, but we'll get up some before pictures for you soon, and the spare bedroom, which is currently storing stuff that we had to move up from the back room so that we could work back there.
Wednesday, March 02, 2011
House Tour
Well, really more like a partial house tour. We're going to take a look at the living room and kitchen, the spare bedroom will be excluded because of things being moved in there out of the back room in preparation for the big reno. And the rest of the house will be on the docket for a little later this week. But without further ado...
Willkommen to our house! This is the view from the front door when you first walk into the house. You step immediately into the living room, no fancy entryway here.
This is the rest of what you see when you walk into the house. That's the bathroom door that you're seeing directly ahead, yeah, it's a little awkward, but what are you going to do?
The other side of the living room looking from the kitchen.
From the living room you can see into the kitchen. There actually used to be a wall with a small doorway exactly like the hall doorway leading into the kitchen, but back before we got married, Jake, his dad, and my dad all got together and tore that sucker down. They also put up that header to ensure that our ceiling was still nice and secure. I'm still trying to dig up some old before pictures; I'll be sure to put them up if I find any.
Here's another picture of the kitchen. The stove is hiding behind the fridge on the left hand side, not the most energy efficient, but it's what we've got for now. The cabinets in the kitchen are actually new too, well, new to us at least. When Jake bought the house back in 2006 the kitchen had some "lovely" baby blue cabinets, and they were only along the wall that the sink is on. Not much in the way of storage or counter space. Thankfully, we have a wonderful friend who flips houses for a living and he was taking these out of the house he was working on at the time and told us we could have them for free! Score! A big THANK YOU goes out to Jason for helping us get rid of those baby blue monstrosities! Over two years later we are still so very thankful to have these cabinets, and the only adjustment we had to make was that there weren't enough upper cabinets, so my dad built us the two open cabinets and matched the wood as best as possible.We still need to get a real counter top sometime, we have a "temporary" one that's been on there for about 2 years now. It's in the plans right after we renovate the back room and re-roof the house, and probably do one or two other projects that we don't even have planned yet. But we'll get new counter tops some day.
Well, that's it for the first two rooms in our house. I love how open these two rooms are now that there's not a wall separating them, it really makes the whole house seem so much larger. Be sure to check back for the rest of the house tour coming up later in the week!
Willkommen to our house! This is the view from the front door when you first walk into the house. You step immediately into the living room, no fancy entryway here.
This is the rest of what you see when you walk into the house. That's the bathroom door that you're seeing directly ahead, yeah, it's a little awkward, but what are you going to do?
The other side of the living room looking from the kitchen.
From the living room you can see into the kitchen. There actually used to be a wall with a small doorway exactly like the hall doorway leading into the kitchen, but back before we got married, Jake, his dad, and my dad all got together and tore that sucker down. They also put up that header to ensure that our ceiling was still nice and secure. I'm still trying to dig up some old before pictures; I'll be sure to put them up if I find any.
Here's another picture of the kitchen. The stove is hiding behind the fridge on the left hand side, not the most energy efficient, but it's what we've got for now. The cabinets in the kitchen are actually new too, well, new to us at least. When Jake bought the house back in 2006 the kitchen had some "lovely" baby blue cabinets, and they were only along the wall that the sink is on. Not much in the way of storage or counter space. Thankfully, we have a wonderful friend who flips houses for a living and he was taking these out of the house he was working on at the time and told us we could have them for free! Score! A big THANK YOU goes out to Jason for helping us get rid of those baby blue monstrosities! Over two years later we are still so very thankful to have these cabinets, and the only adjustment we had to make was that there weren't enough upper cabinets, so my dad built us the two open cabinets and matched the wood as best as possible.We still need to get a real counter top sometime, we have a "temporary" one that's been on there for about 2 years now. It's in the plans right after we renovate the back room and re-roof the house, and probably do one or two other projects that we don't even have planned yet. But we'll get new counter tops some day.
Well, that's it for the first two rooms in our house. I love how open these two rooms are now that there's not a wall separating them, it really makes the whole house seem so much larger. Be sure to check back for the rest of the house tour coming up later in the week!
Tuesday, February 22, 2011
Making Out... Part 2
Here's the second part of how I made out like a bandit, as promised. This time I went to Target, and I snagged some great stuff at even better prices! The first items I got were these sweet napkins I've had my eye on for a while, but since I'm the biggest cheapskate ever I wouldn't buy them when they were on clearance for $4.98.
Isn't that the prettiest little napkin? And I got them for only $2.48 for four of them. I was pretty happy about that, but there was more happiness headed my way in the form of these tablecloths that matched the napkins.
I'm not entirely sure how I'm going to use these beauties since they're for an oblong table and I have a round one, but I have several ideas. Perhaps curtains, or pillows or the material to cover that little bench I've been wanting to work on. If all else fails I can always just make more napkins I suppose. I also picked up this tablecloth that yes, is the exact same one as what is already on the table.
I figure if this one gets stained or torn or something I'll always have another. I'm kind of crazy like that sometimes. My next great snag were these two place mats.
As you can see they are slightly different colors, but since I don't plan on using them next to each other that shouldn't be a problem. I've already found a home for one of them on top of a little bookshelf. The last deal of the day were these two vinyl place mats that I plan to use for outdoor get togethers.
I already have coordinating flowered ones that I used for our Memorial Day Party this last year, and I thought these little circular ones would be the perfect addition to them. And at $.48 a pop how could I resist.
So let's see the final price of all of this, here's a picture to remind you of everything I snagged.
Here's the run down:
1 package of 4 napkins- $2.48
2 60x84 tablecloths-$1.98 each $3.96 total
1 round tablecloth (identical to what I already own) $3.74
2 flowered place mats-$.98 each $1.96 total
2 circle place mats-$.48 each $ .96 total
Grand Total: $13.10
Not too shabby, eh? And I actually got an extra 5% off because I used my Target debit card. So ends my bandit adventures, hopefully I will have some more fun finds soon though since we are getting ready to completely renovate the back room. Stay tuned for more details.
Isn't that the prettiest little napkin? And I got them for only $2.48 for four of them. I was pretty happy about that, but there was more happiness headed my way in the form of these tablecloths that matched the napkins.
I'm not entirely sure how I'm going to use these beauties since they're for an oblong table and I have a round one, but I have several ideas. Perhaps curtains, or pillows or the material to cover that little bench I've been wanting to work on. If all else fails I can always just make more napkins I suppose. I also picked up this tablecloth that yes, is the exact same one as what is already on the table.
I figure if this one gets stained or torn or something I'll always have another. I'm kind of crazy like that sometimes. My next great snag were these two place mats.
As you can see they are slightly different colors, but since I don't plan on using them next to each other that shouldn't be a problem. I've already found a home for one of them on top of a little bookshelf. The last deal of the day were these two vinyl place mats that I plan to use for outdoor get togethers.
I already have coordinating flowered ones that I used for our Memorial Day Party this last year, and I thought these little circular ones would be the perfect addition to them. And at $.48 a pop how could I resist.
So let's see the final price of all of this, here's a picture to remind you of everything I snagged.
Here's the run down:
1 package of 4 napkins- $2.48
2 60x84 tablecloths-$1.98 each $3.96 total
1 round tablecloth (identical to what I already own) $3.74
2 flowered place mats-$.98 each $1.96 total
2 circle place mats-$.48 each $ .96 total
Grand Total: $13.10
Not too shabby, eh? And I actually got an extra 5% off because I used my Target debit card. So ends my bandit adventures, hopefully I will have some more fun finds soon though since we are getting ready to completely renovate the back room. Stay tuned for more details.
Thursday, February 17, 2011
Making Out... Part 1
Making out like a bandit that is. I've had an excellent week of shopping that I just had to share. It started this weekend while Jake and I were celebrating Valentines Day. We went to dinner and then decided to go wander around TJ Maxx for a little while to see if they had anything interesting, and we found several things that we had to bring home with us. The first item we found was this cute little votive holder.
Isn't she just so sweet? Can you believe she was only $4? This was my favorite buy of the night, she's just so cute! And I love the way she looks on our bookshelf too, but I'm not sure if it will be her permanent home or not.
Our next great find was this wall decal. We've been trying to figure out for a while what to do with the giant sliding closet doors whenever we reno the back room this spring/summer. Well now we know what we're doing, or we have a descent idea anyway.
We aren't sure if we're going to use the actual decal on the door or if we'll just use it as a stencil to put up something in a slightly different color than the doors but keep it all in the same color family. And it was on clearance! Wohoo!
We figured $7.50 for such a great little addition with so many possibilities wasn't too high of a price to pay.
Now on to our last bandit buy of the night. As I was still drooling over some furniture and the votive holder from earlier, Jake found this great charging station.
Now to understand just how excited I was about this you would have to share my extreme hatred of all cords. Cords are my nemesis. I cannot stand having them out and tangled, trying their best to collect dust. I wish all things could be completely wireless, which could make my life harder in some ways considering my husband is an electrician, but it's a small sacrifice to make to have the world rid of evil cords. So, back to the charging station. This baby will at least help contain some cords, which I am super stoked about (that's right you heard it here first, "stoked" is totally back). The best part about this little puppy, well second best part after hiding those evil cords, is that it was only 2 buckaroos! Crazy! The cheapest I've ever seen something like this is around $10, and since I'm also a cheapskate I always refused to pay that much.
As you can see, the tag is marked "as is", but the problem with it was so small that it really wasn't a problem at all. There was just a tiny bit of wood splitting on one part of it, which we can always take care of with some wood glue if we get the urge. Needless to say, even though I love that little flower votive holder to death, Jake definitely won the Deal of the Night Award. And he was pretty happy about his find too, between his love of technology, my hatred of cords, and our love of all things bargain, it was like a match made inheaven TJ Maxx. So concludes the first part of the bandit shopping. We'll be back a little later with a Target trip that we put on our bandit masks for and came out loaded.
Isn't she just so sweet? Can you believe she was only $4? This was my favorite buy of the night, she's just so cute! And I love the way she looks on our bookshelf too, but I'm not sure if it will be her permanent home or not.
Our next great find was this wall decal. We've been trying to figure out for a while what to do with the giant sliding closet doors whenever we reno the back room this spring/summer. Well now we know what we're doing, or we have a descent idea anyway.
We aren't sure if we're going to use the actual decal on the door or if we'll just use it as a stencil to put up something in a slightly different color than the doors but keep it all in the same color family. And it was on clearance! Wohoo!
We figured $7.50 for such a great little addition with so many possibilities wasn't too high of a price to pay.
Now on to our last bandit buy of the night. As I was still drooling over some furniture and the votive holder from earlier, Jake found this great charging station.
Now to understand just how excited I was about this you would have to share my extreme hatred of all cords. Cords are my nemesis. I cannot stand having them out and tangled, trying their best to collect dust. I wish all things could be completely wireless, which could make my life harder in some ways considering my husband is an electrician, but it's a small sacrifice to make to have the world rid of evil cords. So, back to the charging station. This baby will at least help contain some cords, which I am super stoked about (that's right you heard it here first, "stoked" is totally back). The best part about this little puppy, well second best part after hiding those evil cords, is that it was only 2 buckaroos! Crazy! The cheapest I've ever seen something like this is around $10, and since I'm also a cheapskate I always refused to pay that much.
As you can see, the tag is marked "as is", but the problem with it was so small that it really wasn't a problem at all. There was just a tiny bit of wood splitting on one part of it, which we can always take care of with some wood glue if we get the urge. Needless to say, even though I love that little flower votive holder to death, Jake definitely won the Deal of the Night Award. And he was pretty happy about his find too, between his love of technology, my hatred of cords, and our love of all things bargain, it was like a match made in
Sunday, February 06, 2011
Drab to Fab
I love a great front porch, who doesn't? They are so homey and inviting. Enter our front porch.
Not exactly your picture of a great front porch, huh? This picture was taken after Jake had already torn down the old ceiling, which you would not want to stand under too long for fear of it collapsing on you. We replaced the old, crumbling ceiling with 3 sheets of bead board, which you can kind of see in the picture. Here's a better view of the new ceiling that doesn't have you running into the house for fear of being buried under it.
It was really a fairly simple switcheroo since the beams that held up the old ceiling were still pretty solid. We just held up the bead board and screwed it into the old rafters that were already there, making sure to leave a hole thru which to hang a new light fixture.
Next came tackling the plain jane white house. Now a few white houses are cute and can pull off being solely white, ours however, is not one of those, especially since the white came in varying shades of peeling. So, knowing that we wanted to paint the door blue (we actually did this project before the blue door) we tried to think of colors that would look good with the blue and add interest to the outside of our ho-hum house. One of the hottest colors in home design right now is gray. Gray can do no wrong in my book. It's just so versatile and can make things look oh-so-sophisticated. We got several different swatches of gray from our trusty Lowes and got to work taping them up where we planned to paint and looking at them at different times of the day. Since the porch faces North, the sun only hits it at certain times of the day and during certain times of the year, so this color had to look great in all lighting conditions. After considering several colors for a day or two we finally decided on the winner. It was a nice, stormy gray that complemented the white and blue without being overpowering. So began the scraping and painting. As you could see in the top picture, our paint was chipping bad, so it definitely needed scraped, if it hadn't been chipping though, we may have just gone straight on to the painting. Good thing it was chipping though, because if we hadn't scraped we may not have found this.
That's right, a rotting pillar. Thankfully it was only one side of the pillar, so it wasn't that difficult to replace. Jake just tore off the rotted side
And replace it with a new piece that he cut to size. We're just very thankful that we caught it before it caused much larger problems. So, with that out of the way we were able to get on with the painting. Once again, to jog your memory, here's the before:
And here's the it's crazy amazing what paint can do, after:
Doesn't it look so much chicer and just all around great?! We have since painted the rest of the concrete white too, and the door blue, but I don't have a picture of that other than the one from the recent blizzard, so if the snow throws you for a loop against all the other summertime pictures, I thoroughly apologize.
As you can see in the picture, we've painted the concrete part of the pillars white, along with the front of the porch, and even the front of the steps, but you can't see that because it's covered with snow. I'll try to get a picture with the sun out as soon as all the snow melts. In the mean time, here's a close up picture of the porch ceiling after it was painted and the light fixture was hung.
Looks great doesn't it? I love how sophisticated the gray looks with the white. Oh, and we got that new light fixture from Lowes for only $10! (it was actually part of a two piece set; we put the other one in the kitchen).
So that's the story of how our front porch went from being boring, and let's face it, a little trashy looking to the cutest little front porch on the block.
Not exactly your picture of a great front porch, huh? This picture was taken after Jake had already torn down the old ceiling, which you would not want to stand under too long for fear of it collapsing on you. We replaced the old, crumbling ceiling with 3 sheets of bead board, which you can kind of see in the picture. Here's a better view of the new ceiling that doesn't have you running into the house for fear of being buried under it.
It was really a fairly simple switcheroo since the beams that held up the old ceiling were still pretty solid. We just held up the bead board and screwed it into the old rafters that were already there, making sure to leave a hole thru which to hang a new light fixture.
Next came tackling the plain jane white house. Now a few white houses are cute and can pull off being solely white, ours however, is not one of those, especially since the white came in varying shades of peeling. So, knowing that we wanted to paint the door blue (we actually did this project before the blue door) we tried to think of colors that would look good with the blue and add interest to the outside of our ho-hum house. One of the hottest colors in home design right now is gray. Gray can do no wrong in my book. It's just so versatile and can make things look oh-so-sophisticated. We got several different swatches of gray from our trusty Lowes and got to work taping them up where we planned to paint and looking at them at different times of the day. Since the porch faces North, the sun only hits it at certain times of the day and during certain times of the year, so this color had to look great in all lighting conditions. After considering several colors for a day or two we finally decided on the winner. It was a nice, stormy gray that complemented the white and blue without being overpowering. So began the scraping and painting. As you could see in the top picture, our paint was chipping bad, so it definitely needed scraped, if it hadn't been chipping though, we may have just gone straight on to the painting. Good thing it was chipping though, because if we hadn't scraped we may not have found this.
That's right, a rotting pillar. Thankfully it was only one side of the pillar, so it wasn't that difficult to replace. Jake just tore off the rotted side
And replace it with a new piece that he cut to size. We're just very thankful that we caught it before it caused much larger problems. So, with that out of the way we were able to get on with the painting. Once again, to jog your memory, here's the before:
And here's the it's crazy amazing what paint can do, after:
Doesn't it look so much chicer and just all around great?! We have since painted the rest of the concrete white too, and the door blue, but I don't have a picture of that other than the one from the recent blizzard, so if the snow throws you for a loop against all the other summertime pictures, I thoroughly apologize.
As you can see in the picture, we've painted the concrete part of the pillars white, along with the front of the porch, and even the front of the steps, but you can't see that because it's covered with snow. I'll try to get a picture with the sun out as soon as all the snow melts. In the mean time, here's a close up picture of the porch ceiling after it was painted and the light fixture was hung.
Looks great doesn't it? I love how sophisticated the gray looks with the white. Oh, and we got that new light fixture from Lowes for only $10! (it was actually part of a two piece set; we put the other one in the kitchen).
So that's the story of how our front porch went from being boring, and let's face it, a little trashy looking to the cutest little front porch on the block.
Subscribe to:
Posts (Atom)