Friday, September 13, 2013

Tulsa Day Trip

Well, we knew it was bound to happen, some day I would forget to do my Thursday update. I really had hoped that it would be longer than three weeks in to the decision to start actually writing on the blog again. Oh well, at least I remembered the next day. Since I obviously hadn't been thinking about my post for the week, I am just going to do a little update on our recent trip to the Tulsa aquarium with some of our friends. So, without further ado:

Since we all live in several different places in the Missouri, Oklahoma, and Arkansas area we met at the Aquarium. Will was fine with hanging around outside for a little bit though.


Here's a look at our whole group once we all got together. We love each and every one of these people so much, they are some of our best friends and we love that even though we don't all live in the same town anymore we still make time to see each other and when we get together we can be ourselves and just be happy to be together, no matter what we are doing.


The aquarium isn't very big, and it seemed a little overpriced, but we were there with people we enjoy, so we had a good time. They did have a few cool displays though, like this one where you could touch several different sea creatures. Will is tormenting a starfish in this particular display.


This tank had a bunch of tiny shrimp in it that you could put your hand in the water and hold them. Once again though, Will thought it looked more like a place that needed some good old splashin' more than calm shrimp holding.


Although it is a small aquarium, they still had some beautiful tanks. Sea life always amazes me at the seemingly endless colors, shapes, and textures that can be found in the ocean. It is a great reminder of the creativeness of our God.


Looking at all that also kind of makes you question the Little Mermaid's judgement a little bit. I mean, when you live down in all that beauty, why would you want to be "up where they play all day in the sun"? Living in the ocean looks pretty good from where I'm sitting, but to each their own I guess.

They also had several places in the aquarium where there were less exotic animals, like this area where you could watch the turtles.


There were some crazy looking animals at the aquarium as well though, like this eel that we decided looked like the Shrieking Eels from The Princess Bride. It was kind of giving Will the death stare too, so I'm glad it was safely encased in glass.


They also had a shark tunnel, but my camera batteries were dying so I didn't end up with any pictures there. I always thought a shark tunnel would be super cool, but after being in one, I think a tropical fish tunnel would be a lot more fun, and definitely more colorful. They also had a cage like the ones you use when you go swimming with the sharks, and let me tell you, after seeing the size of the holes in that thing, you will never catch me swimming with the sharks. (Sorry for the poor lighting, I had to use my phone since my camera batteries died.)


We found Nemo.


And jellyfish. Not to be confused with jelly fish (does this video pop into anyone else's head when you see a jellyfish?)


That pretty much covers the aquarium. After we got done we decided to go to a park that had a splash pad to let the kids get down and run around a little bit. Not much happened at the park, so I'm just going to throw a whole bunch of pictures here without much narration since they are pretty self-explanatory.


I just have to say, I think this next one is super sweet. I love the way they are looking at each other. 


Will loves to swing, he just laughs and smiles the entire time. 


We ended with a meal at a great little pizza place called Hideaway Pizza, if you live in or are visiting the Tulsa area I would highly recommend it. So that was our trip to Tulsa at the end of July, we had a great time with some really great friends, and I am so glad we got to do it. We always love spending time with friends and getting to check out new places.

Thursday, September 05, 2013

Kitchen Update

Over the summer we have worked on updating our kitchen. When Jake bought the house in 2006, the kitchen was a hideous baby blue color, walls and cabinets included. So, when our friend who flips houses offered us some cabinets that he was taking out of a house, we jumped at the chance to change out those old ugly cabinets and put in something a little more our style. We also repainted, took out a wall, and planned to get a dishwasher, new counter tops and a back splash. That was five years ago, and to our shame, that is where our kitchen renovation stalled for quite a while.


 We had set the old counter from the other cabinets back on (we didn't even worry about securing it too much since we weren't planning to have it there very long) and the other part of the counter where we had added a new section of cabinets was graced with a piece of plywood covered in some leftover linoleum flooring from my parents' kitchen. There was also a hole where we planned to put a dishwasher and an awkward corner that needed closed off since we didn't have a corner cabinet for it. So finally this summer we decided to go for it. We wanted to get this thing tackled once and for all. The first step was taking off the current counters so that we could fill in the corner.


We did all of this in a pretty short time frame so that we wouldn't have to deal with no counters for a long period of time, hence the new counters sitting on the cabinets in this next picture. They had been delivered but not installed yet. That's my dad in this picture by the way. He is super handy and loves helping his kids out with things around the house, so he comes over and works on projects with us sometimes. He even built our upper open cabinets for us when we realized we would need more than what we got from our friend. Anyway, back to the kitchen, Dad came over and put in the corner piece and also replaced the side piece for the dishwasher since the one we had gotten back in the day wasn't going to be quite the right size.


The next day the guy from Lowes came over to install the counter tops (Lowes actually hires out their installation, but I don't know the name of the company they use in our area). We could have installed them ourselves, but since it was only about $100 more to have them professionally done we decided to save ourselves the headache. Some things are worth doing yourself while others are worth having the pros do, and for that price we decided to have a pro do it. It was also nice having them install it since that meant they would come out and measure the space for us, so if the counter came in the wrong size it would be their responsibility to fix it, not our fault that we have a counter that is four inches too short. The counter we went with was a laminate. I know some people can't stand laminate, but it was quite the upgrade from the laminate flooring that we previously had as a counter top, so I have no problems with it whatsoever. They have also come a long way with laminate in the last few years, so it doesn't have to be a cheap looking one tone counter, ours looks kind of like some sort of expensive granite, but without all they annoying upkeep of granite. We went with Ebony Fusion from Wilsonart Laminate.


I really like the marbled look and the subtle browns and greys that it has in it, it really gives the counters some depth. Our system for picking our counter was very simple, we just grabbed several samples we liked at the store, held them up to display cabinets that they had in the store that were the same color as our cabinets and found the one we liked the best. We both really liked Ebony Fusion at the store, but we went ahead and brought it home to look at it in our kitchen so that we could see it with the lighting, wall and cabinet colors before we made our final decision. We are very happy with the results. 


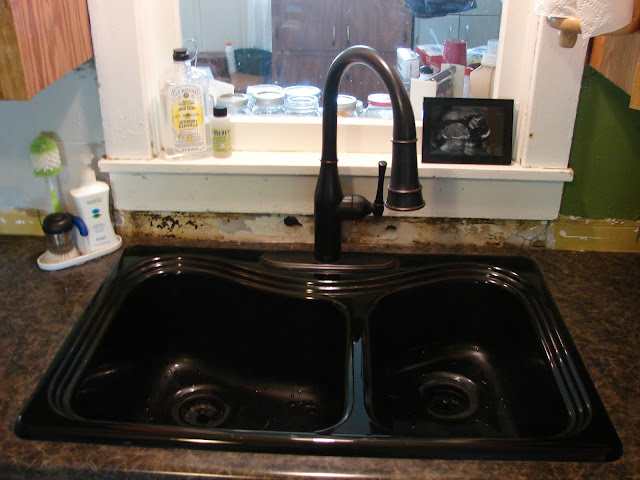
After the counters were installed the kitchen was looking much better, but the sink that we had ordered to go with our new counters still hadn't arrived. We ordered this sink from Lowes and it was supposed to be delivered in store the same day the counters were installed, but it took an extra couple of days to come in, so we just set our old sink in the hole, but we didn't use it since it wasn't sealed in and we didn't want to mess up the new counters. Once the sink came in, Jake got right to work installing it, unfortunately, since the basins are different depths, the plumbing underneath took a little more time and more trips back to Lowes than we anticipated. After a couple hours he got it installed though and we had a sink and faucet that fit much better with our newly upgraded counters.


I couldn't find our exact faucet on the Lowes website, but it is basically this one. We picked it out at the store and splurged a little to get the pull down faucet with the different spray options. I've never had a faucet that does anything but just spout water normally, so the fact that if pulls down and has three different spray options makes me feel so fancy, it's like I should be cleaning dishes at the White House or something. Just look at its curves, meow!


After getting the sink installed we ordered our dishwasher. Because our house is small and these cabinets weren't made for this kitchen, we ended up having to get an 18" apartment sized dishwasher instead of the standard 24". Any dishwasher is definitely an improvement over no dishwasher though, and it actually holds quite a bit. We rarely have problems of it not holding everything we need it to, even when we have people over. We got this whirlpool because the reviews we read were good and it had a pretty good price. Unfortunately, even though our dishwasher is smaller, since it is more of a specialty item it costs more than a standard size dishwasher, so $650 for it wasn't really a bad price. My dad came over to do a little cabinet work before we installed it and then he and Jake installed it after Jake got off work. They also had a little helper.


So that's where the kitchen is at now. We still need to put up the tile back splash, we have all the materials, we just need to get it done, so hopefully we will get that done pretty soon. So there's our kitchen updates so far. I can't wait to get the back splash done and we get to see this kitchen all put together and looking good for the first time in this house's history!

Thursday, August 29, 2013

Change in Style

Okay, I know I have not done well at keeping this little ol' blog updated. I always have great intentions, but I don't have the best follow through. Hopefully that is going to change now; however, I do plan to switch things up a little bit. In the past this has been solely a home improvement blog, but with some of our family and close friends recently moving out of the country, I have decided to make it a general "what's going on in our lives" kind of thing, which will still include home improvement stuff, but will also have stuff about our family and possibly random other musings, we'll just have to wait and see. I recently quit my job in order to stay home with our son, so I should have time to actually write and update on here. This is me with my little box packed up from my office on the last day.


I really am thankful for my job, it was a great transition leaving, and I know the person that took over for me will do great, but I worked there for 5 1/2 years, so it is still a strange transition and I am still trying to adjust to life at home all the time and to get a schedule down. Right now I plan to try to write something every Thursday, so that I have a set schedule to keep me on track; there may be weeks when I do more, or there may be weeks when I don't post at all, but for the most part I intend to get something down every week. So, without further ado, here is what's been going on a little bit lately:

Lately Will has been getting teeth like crazy. I think all this summer rain helped them shoot up. He has 7 teeth now. His first two teeth came in together a few months back, then about a month ago he got 4 top teeth all at once, and now he just got another one on the bottom. He hasn't let me get a good picture of all the teeth yet, but here is a picture of the little stinker anyway.


I also got a new diaper for Will at our new cloth diaper store, Baebalou. I cannot tell you how excited I am that we now have a cloth diaper store in town! When did Joplin become cool enough to have that? I visited it a couple of weeks ago with my friend Amanda, and I just loved it. It was so sweet, and the owner was very nice and helpful. They also have a little consignment area as well as some things handmade by some local vendors, so if you live in the Joplin area and have a young child you should definitely check it out. Here is a sweet little tie made by one of the vendors.


And here is the best shot I could get of Will with the new diaper on, he is a fast little bugger. It's a super cute pattern on the diaper, with different pictures of bicycles. It's a gro-via brand, and I am undecided as to whether I am totally sold on the actual style of diaper or not since I love my bum genius freetimes so much, but it sure does look cute on him.


To wrap up I thought I would throw in a little house project that I did recently. Did you know that they make small rolls of burlap? I had no idea until I was wandering Michael's the other day and spotted it in a bin near the entrance. Almost immediately I got a great idea for a new wreath for the front door. Remember this wreath that I made for Christmas a few years ago? Through a couple of years of storage the streamer that it was wrapped with was starting to not look so hot, and the snowflakes were starting to fall off as well. I figured for the tenish dollars that I spent on it two winters ago it had served me well though, and it was time for it to move on to something else, and now I had my inspiration. 


So I quickly removed the snowflakes and streamers (I saved the snowflakes since I can use them for other projects down the road) which only took a couple of minutes. Then I was left with this:


I had left the plastic wrapping on the wreath previously in order to try to keep the straw from poking through the streamer, and since I was planning to wrap the whole thing up again I decided to go ahead and leave the plastic on it. Why make a mess of straw when you don't need it? I took my roll of burlap that I snagged for $6 (seriously, how did I not know about this stuff), wrapped the wreath up, and then just used straight pins to secure it to the straw.


If you look closely here you can see one of the pins I used to secure the ends. This step also only took a couple of minutes.


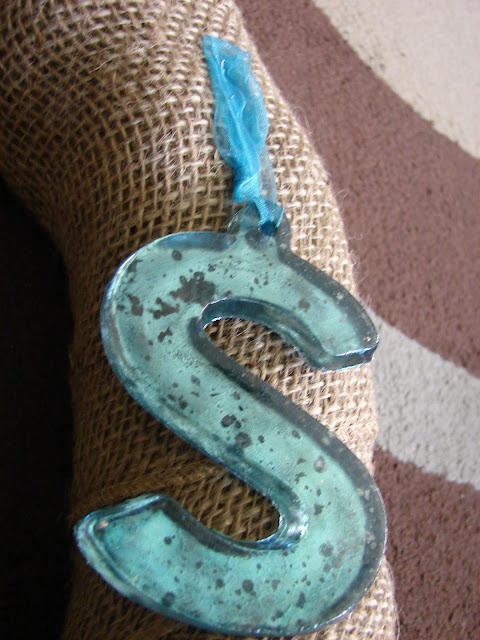
Since I had this project in mind as soon as I saw that burlap looking up at me out of that fateful bin, I had also picked up some burlap flowers that were on sale and a fun mercury glass looking "S" to add a little color and interest to the wreath. Once again I just used straight pins to attach the flowers and initial to the wreath, making sure to hide the pins and using the flowers to cover up the ribbon on the "S".


Here's the finished product. I love the way it turned out, and how simple and quick it was to throw together.


Here's the view of the wreath hanging on the door. I ended up tying on a piece of ribbon for it hang from since it kept falling down when I tried to just hang it like this. I think it is super charming and quaint, and the cool blue of the "S" plays very nicely with the more saturated color of the door. I also love that it works for any time of the year since the colors are universal enough to coordinate with any season. 


So that wraps up the first of (hopefully) the weekly Thursday posts. I hope you like the new style and topics!

Saturday, December 22, 2012

Last Minute Decorating

Christmas is only a few days away, but there is still time to do a little festifying around the house if you haven't done so yet. We have an easy, fast and relatively cheap option for putting up some cute little Christmas trees outside your door, or wherever you happen to need a little more Christmas cheer. We saw this idea on pinterest and it is originally from here but we did a little tweaking to make it work a little better for us.

Here is the list of what you will need:
  • Tomato cages
  • Poster board (we used black to help it blend in)
  • Christmas lights
  • Garland
  • Tape
  • Bricks or something else to hold down the tomato cages so they don't blow away in the wind
So, to get started get out your tomato cages from the garage since no one is growing tomatoes this time of year anyway. Set them upside down where you want your Christmas trees, and if you are putting them outside you might want to have something to help weigh them down; we just put a brick across the bottom of the cage to help in case of wind.

 
I know it doesn't look like much right now, but it will turn out looking great. And in case you are wondering if you can skip the next step (poster board) and go on with the wrapping, here is what our tree looked like before we added the poster board step.  A warning for those with a weak stomach, it isn't pretty.


We also learned from that sad, ugly little tree that it is better to wrap the lights first and then the garland after. So next, take your poster board and wrap it around the tomato cage taping it shut to give it a more conical shape. We used two pieces of poster board, but how much you need would depend on the size of your tomato cage.


After the poster board you add the lights. We started at the top so and worked our way down so that the lights wouldn't be able to slide up the "tree". We also added tape every now and then to help keep them in place.


Finally we added the garland. We used a 50 foot garland for each tree just to make sure that it looked nice and full when we were all done. Just as with the lights we started at the top and worked our way down wrapping the garland as we went. We taped the end of the garland to the top of the tree and then just tucked the bottom end underneath the brick that was holding the whole tree down. 


 Once it is all put together it looks a little something like this. 


And at night (please forgive my poor nighttime photography skills). 


So there it is, a simple 15 minute project to bring a little more cheer into your Christmas. Merry 
Christmas to all and to all a good night!