Friday, April 29, 2011

Where Have You Been All My Life?

How have I not known how wonderful spray paint is until just in the past few months? Seriously, I'm loving me some spray paint these days and today I'm back with another spray painting triumph (you can read about the butler tray triumph here).

I got these great candlesticks at a garage sale for only 25 cents! Can you believe it?! It was love at first sight, so I snatched them right up, knowing that with a little love (in the form of some Valspar spray paint) they would be good as new.


I actually picked these up a few months ago, I was just a little slow in posting it. Jake wasn't so sure about them at first, but when he saw the finished product he had to agree that they were a great buy. Since we weren't sure how well the spray paint would stick to the slick metal we decided to rough them up a little before painting. So we got out our handy, dandy dremel tool and got to work sanding.


It was actually one of the few times I've used the dremel, so I was having a good old time with it. After a little while of roughing up the candlesticks they were looking a little something like this.


Now they were ready for the paint. We decided on black to put them in the living room and Jake was a little afraid that white might look kind of cheap, so I grabbed our can of black spray paint and got to work.            


I was a little afraid of the detail on them, but they really weren't hard to paint at all. Here's a look at one with the first coat on next to the unpainted one.


Here's how they ended up after I finished with all three coats of spray paint (I probably could have gotten away with two coats, but I did an extra for good measure).


Don't they look great? I still can't get over the fact I got them for just a quarter. And for real, where has the spray paint been all my life? I really had the urge to open up our dining table as long as it would go and then set one candlestick on each end and eat dinner facing each other at opposite ends of the table feeling all fancy like that (while speaking in a British accent of course), but then I decided that I would prefer to actually be able to talk to Jake during dinner, so I nixed that idea. I still love the way they look perched on our tv though, and if I someday find the slightly wider and thinner tv stand that I'm looking for I know they will look great sitting up on top of it. Until then I'll just dream about being all fancy and speaking with a British accent, especially after watching the Royal Wedding this morning...

Any other spray paint fanatics out there? Or maybe some spray paint failures? Please feel free to share with us, we love a good story.

Friday, April 22, 2011

Happy Earth Day

As you probably know by now, today is Earth Day, and we decided to celebrate in a couple of different ways. The first thing we did today was to go by Starbucks to get a free brewed tea in a reusable tumbler, ok, maybe that was a fairly selfish way to celebrate, but it was a tasty one.
Next I visited our local farmer's market, which had its opening day of the summer market today. Buying from your local farmer's market is a great way to go green and live sustainably by using fresh ingredients (which taste much better anyway), and you are also supporting local growers, so it's a win-win. I didn't buy much at the market today, but I did pick up some mint to throw in my aforementioned tea, and I've heard that adding a little fresh mint to water is really refreshing, so I thought I'd give it a try.

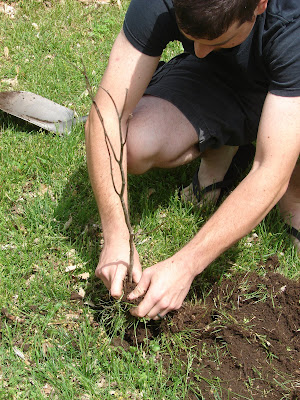
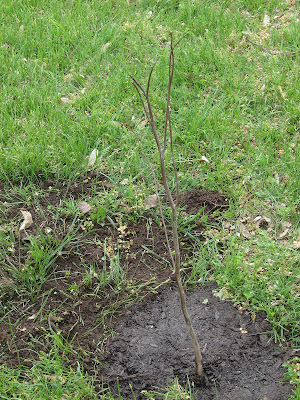
The other way we decided to celebrate was by planting a new tree in our yard. The farmer's market was giving away redbud trees today in honor of Earth Day. There was a long line for the trees, but thankfully I got there early and they were well stocked. They even gave us this little paper with information about the tree (most of which I already knew from growing up a country girl, but a refresher is always nice).
We thought about where to plant the tree for a little bit before deciding on the front yard since we want to keep the "back 40" as we call it, in the back yard pretty sunny for our vegetable garden. We also liked the idea of balancing out the front yard with another tree on the opposite side of where our big elm is growing. It worked well with our OCD need for everything to be even.
It's not much to look at right now, but hopefully after a little care and time to grow it will be looking good and start to balance out the lopsided lawn.

For anyone else interested in planting your own tree for Earth Day, Lowes is giving away 1 million trees tomorrow, so visit your local Lowes store to snag one of your own.

Monday, April 18, 2011

Walled In

We've been hard at work on the back room over the last month and a half, and the finish line is getting closer. This week we put up the paneling on the north wall of the room. This was the only wall in the room that wasn't paneled, and it wasn't exactly done the best whenever the room was added on (it used to just be a porch). You see, instead of removing the siding from the house and putting up insulation and then drywall, they decided to take the easy way out and just cover it up with whatever materials they had on hand. Like this particle board I discovered one day when I decided to take down the wall paper.
 Not exactly the nice, smooth drywall I was expecting to find. So what do you do when someone took the easy way out and just covered up the siding? You take the easy way out too! Well, in this case we did anyway, it just didn't seem worth the time and effort, not to mention money, to take down the wall, remove the siding, insulate, and then put the wall back up again, so we decided to cover it with more paneling. That's right, as much as I hate paneling, I had to admit that this seemed like the best plan. It would make the room look more cohesive and since the original wall wasn't done the best it was a little on the wavy side and we figured the paneling might help hide that a little bit. So we got to work.

We learned a very important lesson very early on with this project, never, never, never buy thin paneling to take home in your truck bed on a day with wind gusts up to 50mph, at least not without some sheets of plywood to help stabilize the paneling. You see, the sheets of paneling that we got were very thin so that they wouldn't bulk up the wall, and they were also 8 feet tall, while our truck bed is only about 7 feet, so they hung out a little on the end, and since they were so thin we didn't want to set anything heavy on them, or tie them down for fear of them ripping (this is where the plywood would have been helpful, we could have just put one underneath the paneling and one on top and then tied them down because of the stabilization factor that the plywood would have added). So we just put them in the truck and hoped for the best. Unfortunately, sometimes the best isn't what you get. We had barely made it out of the Lowes parking lot when one sheet blew out of the truck bed. Jake quickly jumped out of the truck and grabbed it before it flew out onto the busy street, but he had to ride in the truck bed the rest of the way home (we do not condone this kind of behavior, but it was all we could come up with at the time). Thankfully, we only live about 2 miles away from Lowes, so it wasn't a long drive, we would have come up with another solution if it had been any farther. And the only damage was that the sheet got torn a little.
 It really wouldn't have been a big deal to use the torn piece though, because the tear was invisible from the front.
We were able to just cut the end with the tear completely off and use the rest of the undamaged sheet since our ceiling in the back room is only 7 feet 3 inches though. We had to measure and cut very carefully for each sheet of paneling because our ceiling actually slopes a little, so each one was just slightly different.
The panel colors don't match, but that doesn't matter since we're planning to paint them anyway.
It's crazy to say this, but I actually felt that once we got the paneling up it actually improved the look of the room, and I can't wait to get to painting those panels to make it look that much better.


There are just a few more things to do before we can paint and get finished with this room, one of those things being trying to figure out where to put the stuff we have in that room while we paint, but it keeps getting ever closer and I keep getting more excited.

Sunday, April 17, 2011

Tray-chic

I love butler trays, and the more home magazines and blogs I read the more I love them. They just make everything that you put in them look more organized, and we love us some organization around here. However, I am too much of a cheapskate to buy them since the ones I typically like run about $15...until now. I found this great little butler tray at Target for only, wait for it, $2.50!
I was in love as soon as I saw it, well, in love with it's potential anyway, Easter-y colors aren't exactly my style, but I knew that with a little spray paint I could spruce this baby right up.

I got right to work with my spray paint on the first clear and warm day that I could (it really was a little anxious of me because it was super windy that day, not the best conditions for spray painting).
It took four coats to get all those stripes to finally and completely disappear, it probably would have been fewer if I had primed, but it was totally worth the wait (and the little dots of spray paint that showed up on my pants, seriously it was windy). I love our new little butler tray, and I think it looks so cute holding our spring colored magazines.
 And the whole project only cost the $2.50 because I already had the spray paint on hand. I still haven't found a permanent home for it, although I'm thinking it might end up somewhere in the back room whenever we get everything finished back there.

Anyone else out a spray paint fanatic? Or found anything in the dollar section that is just brimming with potential? Please feel free to share, we love a good redo around here.

Sunday, April 10, 2011

It's a Jungle Out There

It was a jungle out there anyway. In the last few weeks our yard went from looking like this
to this
Since from the above picture you can't really get the full effect of how out of hand things were, allow me to show you a close up.
Honey I Shrunk the Kids flashbacks anyone? The grass wasn't the only thing that was out of hand either. We didn't really rake up the leaves last fall like we probably should have, so our fence row had quite the pile of leaves blown up against it. So, while Jake picked up trash that had drifted into our yard and started trimming the bushes, I raked all the leaves away from the fence so that we could mow over them and create a natural mulch-like effect.
In one corner of the yard the leaves had actually built up about 2 feet high, and in a flower bed no less, so it wasn't the easiest trying to remove the leaves without mangling the daffodils and irises. There were a few casualties, but no flower massacre or anything like that.
While I was working on the leaf raking, Jake was busy trimming the bushes in the front and back. The bushes actually create a border above the retaining wall in front of our house, and they were getting pretty unruly. But Jake got out there and told them what was up, and they are looking pretty good now. You can see the difference in this picture between the right side of the bushes that Jake had trimmed and the left side that was in the process of getting its buzz cut.
Since we like to get the bulk of our yard work taken care of in one day so that there's only maintenance to take care of the rest of the summer, we also cleaned out the flower beds, planted some seeds, mulched, mowed, and burned all the bush trimmings, as well as the rest of our burn pile (including our Christmas tree that has been out there since January). In all it was a pretty productive day, and we can't help but smile every time we've looked at the yard today because of the major improvement.

And here's a parting look at the front of the house with the newly trimmed bushes and nice, short grass.
Whew, now that that's taken care of we can get back to working on the back room renovation. It's getting closer to being finished, but there's still a lot to do before the final before and after reveal.

Tuesday, April 05, 2011

Roll on, Roll off.

While I'm not a student of Mr. Miyagi's, and there may not be a karate lesson to be learned from using a paint roller, it doesn't stop me from making 80's movie references. Recently we posted on mudding and taping, now we will finish the ceiling by texturing and and painting. Here's a picture after the mudding is complete.
Some may wonder about why it's good to texture ceilings and walls. The main reasons are to cut down on glare and to hide any imperfections. Smooth surfaces reflect light a lot easier than rough surfaces and I personally like the look of a lightly textured ceiling over a smooth one.

Texturing is not as difficult as it may seem. Here's a list of what you'll need: a roller handle with a course roller on it, a bucket of mud, a roller grate for a bucket and some water. Here's a picture of the bucket and grate so you can see what I'm talking about.
 When you water down the mud you want the consistency about half way between mud and paint. A little runny but still clinging to the roller pretty well. After that you just paint it on.
The secret is imperfection. Make sure you get the roller lines out, but other than that you aren't going for perfectly spaced lumps or a pattern. Just let the texture do it's thing and when it's dry it will look great.
Though you can't see it very well in this picture, the shading of where the tape is still show through a little bit. So you still need to throw a coat or two of ceiling paint up. Then you have a complete ceiling.

Sunday, April 03, 2011

Caulk It to Me

Remember all those nails that we removed from the walls of the back room and showed you here? Well, all those nails left quite a few holes in the walls, holes that when painted over would show up, especially since we're painting the walls a light color, light colors show imperfections easier than darker colors. So, to take care of the holey problem I got my caulk on one night.
 For anyone who's never done it before, caulking is a very simple process. You simply take the bottle of caulk, load it into the caulking gun, and get going. You put your caulk wherever you need to repair a hole, crack, etc. and then wipe away any excess so that you have a nice, smooth surface to work with. You don't have to try to be clean when caulking, any excess wipes away easily with a damp cloth, and you can even use your fingers to apply it if that's your style. The "hands on" approach works best for me, but Jake prefers to use the gun. By the time I was done with the walls in the back room they were looking a little like a kid with chicken pox being treated with calamine lotion, anyone else remember that experience as a child?
We've since wiped the walls down and they are ready to prime. There were a couple of larger holes in a few of the knots that we probably should have used wood putty for, and would recommend that to anyone else who may be taking on this kind of a project, but we didn't have any on hand, so we just made due with what we had. Anyone else been getting their caulk on recently? or Preparing to paint wood paneling?