Monday, March 28, 2011

Mud and Rock

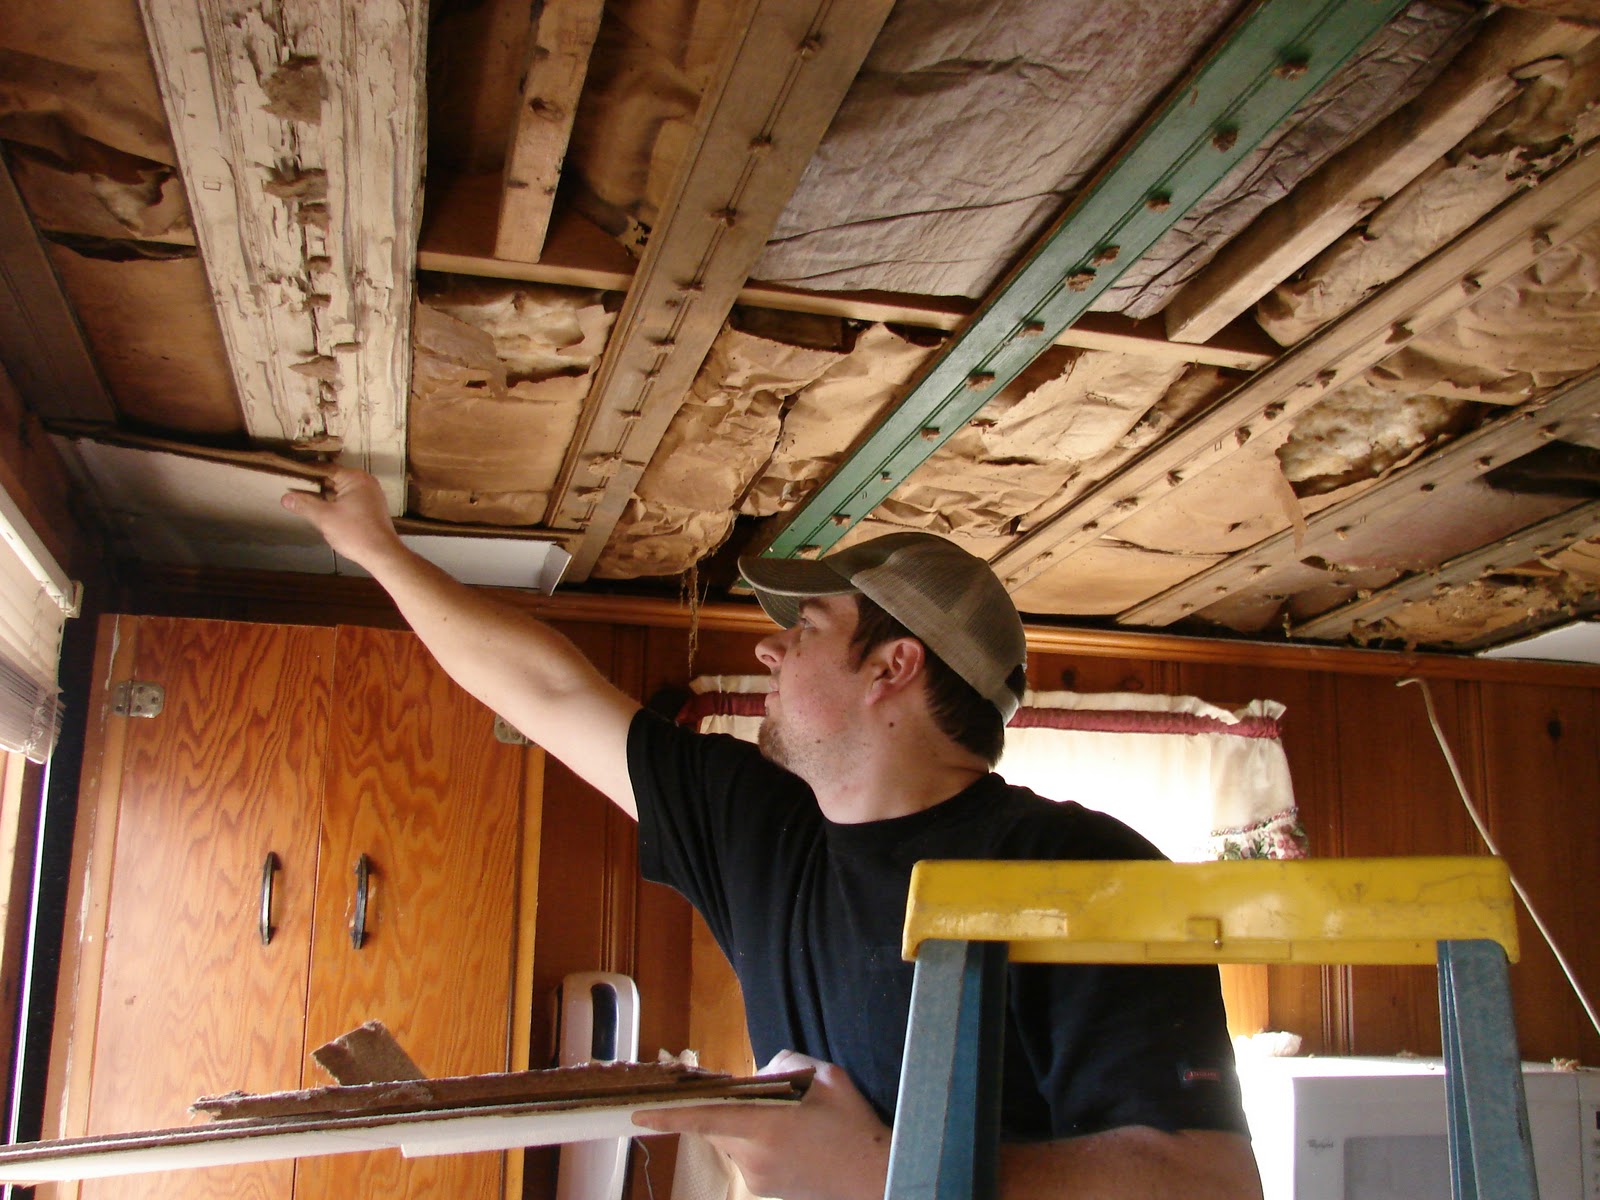
Mud and sheet rock that is. We got the ceiling put up in the back room this weekend! It was a fairly long process, but it looks so great now, it was totally worth it (says the wife that mostly just watched as her husband and father-in-law did most of the work). If you've never put up sheet rock before, I'm not sure I would suggest starting with a ceiling, it is one of the most challenging sheet rock projects since you have to hold it up while trying to get it secured to the ceiling. To demonstrate what I mean, why don't we look at some pictures?
The above picture was taken after some of the grunt work had already happened; it wasn't the easiest to get the sheet rock off the ground and up to the ceiling, then you have to make sure it's butted up against the wall and previous piece of sheet rock so that everything goes up nice and straight and you don't have to do a ton of mud work later on down the road. We used ten foot wide sheet rock so that we would have fewer seams since our room is only about nine and a half feet wide and we cut the sheet rock to fit. After the sheet rock is in place you screw it to the rafters with sheet rock screws, starting around the edges and then working inward. To ensure that you are putting the screws into rafters you have to use a straight edge and draw lines on the sheet rock for a guide of where to put the screws.
You also need to measure out exactly where the lights are, because you will cover them up with sheet rock and then cut holes in it for them to shine through.
Another thing you need to be careful of when putting up sheet rock is how deep you set the screws. If they go too far in they won't hold, you want to have them as flush with the sheet rock as possible. The screw on the right is too deep and would probably not hold very well, so we had to put in another screw to the left of it to be sure it would hold. The one on the left is pretty much what you want your screws to look like.

You can put the screws up with just a simple drill (cordless would definitely be the preferred type), or if you're like my father-in-law and have friends with fancy tools, you might be able to borrow a cool dry wall specific tool that helps you put the screws in quickly and efficiently. You can kind of see what it looked like in this picture.
By mid afternoon the sheet rock was all up and the room was looking good, but we still had all the mudding and taping to do.


To mud and tape you first put a nice layer of mud (mud that you buy at the hardware store that is, don't just go make some mud with dirt out of your back yard) down the seam where the two pieces of sheet rock meet.
Then immediately afterward you apply the tape (also from the hardware store and specifically for dry walling) down the seam.

You then go down the seam with your mudding knife to get the tape good and tight and to remove any excess mud, then you follow that up with another layer of mud, and then go down with the mudding knife removing any excess again. It's all a very monotonous job, but it's what makes your ceiling look smooth and seamless in the end.
You also need to mud over the screws, but that is a much easier project, you just need a small, smooth layer of mud over each of them. At the end of the day, your sheet rock should look something like this.
You still have to mud two more times to get a nice, even coat, but you have to wait a day or so between muddings. You also sand any rough parts down at the very end of the process. We had a nice sander with an extension to do the job. As you can see the ceiling is looking nice and smooth here.
 Later this week we'll show how to texture the ceiling too, but for now we're enjoying our newly sheet rocked back room. Oh, and having a white ceiling up makes the room seem so much brighter! Things are really starting to move along.

Tuesday, March 22, 2011

Brrrr...It's cold in here

It's cold in here now that is...We got a new refrigerator/freezer! When Jake bought the house five years ago the appliances were included, and they lasted for us pretty well, but slowly and surely they are starting to not work quite as well. We had to replace the stove last May because the oven stopped working, and recently the fridge gave us a little scare. Even though it started working again and has stayed very cold since, we decided it was time to move on. So, we went shopping. We did a little online research before leaving the house, but we're pretty tactile, so the best way for us to find something we like was to just go out and look. We checked most of the major retailers in the area, and after coming home to do some more research and look at the reviews of the ones we liked, we ended up with this guy:
Isn't he a beaut?! It's the Kenmore 18.2 cubit foot top freezer refrigerator.When we replaced the stove we got a black one, because the dishwasher that we are planning to install is also black, so now the fridge matches too! I know, I get excited easily, but I love that all of our appliances match now. Since Sears was in the middle of inventory we did have to wait about a week and a half before it came in, but it was worth the wait. And it looks so nice in it's new home.
Here's a look at the inside. I still haven't figured out how to organize everything in the door, but it's coming along.
The new freezer is slightly smaller than the old one, so that took a little maneuvering, but we got it worked out now.

We also got a great deal on our fridge. It was on sale for $384.99, $165 off of the regular price of $549.00. And if we are able to sell our old fridge on Craigslist for about $100 or so then that means we only spent $284.99! Not too shabby for one that was pretty much comparable to our old one size-wise, and we really love that the shelves and drawers are clear so that we can see everything we have easily and won't accidentally buy something that we already have and waste food.

I feel kind of sorry for the old fridge though since it's still living in the house for now, it kind of reminds me of the swiffer mop commercials.


Our old fridge is looking sadly upon the new one and singing "baby come back". Can't you just see it? No? Maybe it's just me. 
Happily, the old fridge will be getting a new home soon. We listed it on Craigslist earlier this morning, so hopefully it will be helping others keep their food cold again soon.

So that was the frigid excitement happening in our house recently, but we'll be back to working on the backroom soon. We'll do a progress update a little later in the week.

Monday, March 21, 2011

Let There Be LIGHT!

Lighting in a room is key. Especially when entertaining company. The lighting in a room sets the mood and if it's too dim people may feel uncomfortable at the intimacy of the setting. On the other hand if it's too bright it can hurt the eyes and feel overly harsh. I tend to err of the side of bright because you can always buy smaller wattage bulbs to soften the lighting. If you don't put enough lighting in a room you have to resort to lamps, which are good for decoration and mood lighting, but are not good if you have to rely on them to light a room.

To the room at hand! Here is a before picture of the lighting in our back room.


As you can see we rely on a lamp to help light the room. Even with the lamp it is a poorly lit room. This is especially bad because this is our "dining room" and sufficient overhead lighting is very important to promote conversation at the dinner table.

Now here is a picture of the room with the new lighting!

It's so much brighter, but not just brighter, it's evenly lit. No more dark patches in the room. To get this effect we used six (two more above where I'm standing taking the picture) recessed can lights. The reason we used can lights is our low ceiling. Most ceilings are at least 8 feet, but our back room is hair grazing 7 ft. 3 inches. Sorry Shaq I know you wanted to come hang out but you are too tall for our back room. Audra wasn't excited about can lights but once I showed her how short our ceiling really was she consented to them and has grown to like them.

Something you need to watch for when using can lights is height above the ceiling.

As you can see we had less than 6 inches to work with. Most can lights are at least 8 inches tall, but we found some shallow ones for a few bucks more. Another thing we had to make sure of was that the can lights were rated for insulation contact. Can lights can get very hot and if insulation is touching them and they aren't rated for it, it can start a fire.

Along with getting wire pulled for new outlets and other circuits in the house(stuff that I would not recommend doing yourself unless you are a licensed electrician) the can lights needed to be put in before we sheet rocked the ceiling. Now that all that is done, we are ready to put the ceiling up!

Monday, March 14, 2011

Progress

The back room is starting to progress; not quickly, but it is progressing. So I thought I would share some pictures of what it's looking like these days. So without further ado,

This is pretty much what it's looking like now. 
 The ceiling tiles are pretty much all down, there are a few stragglers though. They actually came down surprisingly easily in about an hour. Here's a Jake pulling some of the last ones down, they really just slipped right out.
And here's a look at our stack of ceiling tiles that we aren't quite sure how to get rid of ye. It's not like they are in good condition where we could just donate them to the Habitat for Humanity Re-Store or anything; eh, we'll figure something out.
 As you may have noticed in the picture with Jake above though, the tiles left behind a slew of staples that had to be pulled.
The staples were spaced at least every inch, usually closer, and all had to be pulled so that we can hang sheet rock for the ceiling. Here's a look at one of the boards staple free and sheet rock ready.

So that's how the room is coming along so far. Next up is lighting. I can't wait for the room to have more than one sad little ceiling light and an old lamp. This room is gonna shine!

Saturday, March 12, 2011

Back Room Befores

So we've mentioned the back room renovation several times, but we haven't really explained why it needs renovated. You see, it's not that we're just reno happy over here (although sometimes that would be a true statement), but the back room is really in need of a lot of TLC. Caution, some pictures are quite disturbing, well, at least if you've had to live with it like this for several years. Here we go:

This is side of the room that we plan to use as a dining room/small reading area. That's our wonderful dining table and chairs covered up in the corner. At first glance it's not so bad, but just wait for it.
Here's a view of the other side of the room. That doorway on the left leads into the kitchen. And yes, the washer and dryer set up is very awkward. That's one of the things we're planning on fixing.
 But the real problem that needs fixing is the ceiling.
You see, about four years ago the roof in the back room started to leak, and although it has since been re-roofed, the damage to the ceiling tiles has never been taken care of, and it's bad.
 Although none of the ceiling tiles have ever got around to completely falling down, it doesn't exactly make for the most attractive room.This stain is our...favorite, if you could call a stain a favorite that is, because it looks like a brain and spinal scan to us.


Another feature of this room was the amount of screws/nails/randomness that was in the walls. You never had to put in a screw to hang anything up in this room, just look in the general area you want to hang something and you were most likely set.

We aren't quite sure what this little box thing and the stuff above it are, we think it might be some sort of switch or something.

All in all we removed 55+ nails/screws/randomness from the wall (we counted 55 originally, but then found more after we thought we were done). Here's a picture of the pile we removed:


So that's what's up with the back room renovation, and why we felt the need to tackle it. Some of our plans for the room are to tear down the ceiling, add more and better lighting, move the dryer over next to the washer, paint and take care of a few other things as well. We'll try to keep you pretty up-to-date on everything, but since we're doing it ourselves it's not moving at the speed of light, but it is coming along. I'll post early next week sometime with the progress thus far.

Monday, March 07, 2011

House Tour Part 2

Sorry it's taken a bit to get the second part of the house tour up, we've been working away on our back room renovation all weekend. Last Wednesday we took a look at the living room and kitchen and discussed the changes that have happened over the years to those two rooms. Today we're going to take a look at the bathroom and master bedroom. So to start things off:
This is our little bathroom. It's the only one in the house, and it's not very big, but it is quite functional, especially with a few alterations on our part.
Those two cabinets in the corner were added by us shortly after our wedding when I moved in and we obviously needed to do something about storage in here. The cabinets were from Bed, Bath & Beyond and we couldn't be happier with them. The lower one stores all our towels, toilet paper and the hair dryer, straightener, and curling iron, along with my make up. Yeah, it's a pretty hard working little cabinet. The top cabinet holds Jake's beard trimmer, some of my hair products and medicines and bandages. Those two cabinets are definitely life savers in our tiny bathroom because they take up so little space, but can hold quite a bit of stuff.
I think this is my favorite feature in our bathroom. Those towels were a wedding gift from some wonderfully thoughtful friends and that picture is one I took when I went to Taiwan in high school.
Two more things to point out in the bathroom before we move on to the bedroom. First is that our sink is a pedestal and that allows for more room in our dinky bathroom, so if you ever encounter a small bathroom I would definitely say that a pedestal is the way to go. Lastly, I want to point out our lovely floor. You may not think it's that lovely, but if you had seen the hideous old yellow laminate that was in there before you would think it looked like a completely new bathroom.

Now on to the master bedroom. Now let me dispel any grand ideas about a sprawling and spacious master bedroom that you may have right now. Our bedroom is the "master" simply because it is the bigger bedroom in the house, but that is where the "master" ends. There is no master bath connected to it, no grand closet, in fact, the closet is shared between the two bedrooms and set up more like a small hallway between the two rooms. So, now that we have the idea of  a "master suite" out of your head,
Here's the "master" bedroom in all it's glory. The bedroom measures about 10.5 x 11.5. 
The walls are coming across kind of pink in most of the pictures, the left hand side of this picture is probably the most accurate though, they are a nice camel tan color.
We plan to get new dressers some day, we just haven't gotten around to it yet. We'll probably use the longer dresser in the spare bedroom someday, but for now it's what we've got.

So that's it for the second part of the house tour. All that's left is the back room, which is currently in limbo, but we'll get up some before pictures for you soon, and the spare bedroom, which is currently storing stuff that we had to move up from the back room so that we could work back there.

Wednesday, March 02, 2011

House Tour

Well, really more like a partial house tour. We're going to take a look at the living room and kitchen, the spare bedroom will be excluded because of things being moved in there out of the back room in preparation for the big reno. And the rest of the house will be on the docket for a little later this week. But without further ado...

Willkommen to our house! This is the view from the front door when you first walk into the house. You step immediately into the living room, no fancy entryway here.
This is the rest of what you see when you walk into the house. That's the bathroom door that you're seeing directly ahead, yeah, it's a little awkward, but what are you going to do?
  The other side of the living room looking from the kitchen.
From the living room you can see into the kitchen. There actually used to be a wall with a small doorway exactly like the hall doorway leading into the kitchen, but back before we got married, Jake, his dad, and my dad all got together and tore that sucker down. They also put up that header to ensure that our ceiling was still nice and secure. I'm still trying to dig up some old before pictures; I'll be sure to put them up if I find any.
Here's another picture of the kitchen. The stove is hiding behind the fridge on the left hand side, not the most energy efficient, but it's what we've got for now. The cabinets in the kitchen are actually new too, well, new to us at least. When Jake bought the house back in 2006 the kitchen had some "lovely" baby blue cabinets, and they were only along the wall that the sink is on. Not much in the way of storage or counter space. Thankfully, we have a wonderful friend who flips houses for a living and he was taking these out of the house he was working on at the time and told us we could have them for free! Score! A big THANK YOU goes out to Jason for helping us get rid of those baby blue monstrosities! Over two years later we are still so very thankful to have these cabinets, and the only adjustment we had to make was that there weren't enough upper cabinets, so my dad built us the two open cabinets and matched the wood as best as possible.We still need to get a real counter top sometime, we have a "temporary" one that's been on there for about 2 years now. It's in the plans right after we renovate the back room and re-roof the house, and probably do one or two other projects that we don't even have planned yet. But we'll get new counter tops some day.

Well, that's it for the first two rooms in our house. I love how open these two rooms are now that there's not a wall separating them, it really makes the whole house seem so much larger. Be sure to check back for the rest of the house tour coming up later in the week!