Friday, December 30, 2011

Year End Wrap Up

As 2011 comes to a close we thought it might be fun to take a look back at what happened in the past year, and maybe take a look at some potential upcoming projects for the next year. But first, check out my awesome Christmas present from my wonderful husband who knows me so well.


That's right, a palm sander. I can't wait to break this puppy out. I have big plans for this little guy. Side note, I love that it came with a storage bag. 

And now for a short round up of the past year. We started out the year explaining how we came to have a blue door in the first place. 


We also went over the porch re-vamp. 


We gave a quick tour of the house, which can now be found on the house tour page.


We bought a new refrigerator that matches the rest of the kitchen much better than the old one did, and is much quieter too.


And the doozy (doozie?) of a project this year, the back room overhaul.


We also did a quick coffee table switcheroo.


And to end the year out we made a nice wintery wreath.


There were also several projects that we haven't gotten around to blogging about yet, like the built-in bookshelf and the brand new shed. Hopefully we'll get to those soon. Now here's a list of projects that we would like to do in the coming year. 
We bought this chair off craigslist a few months ago and I still have yet to do anything with it. I need to either clean the upholstery really well or else reupholster it. We'll have to wait and see what happens. We also need to replace the cushion, but that will hopefully be the easy part of the project.


We got this stool from Jake's great-grandmother several months ago. I've been planning to sand it down and paint it, as well as reupholster the seat, maybe now that I have my new palm sander I'll finally get to that. 


We are also hoping to get new kitchen counter tops this year, but we're saving up for them right now. (this is where I put our NEVER USE CREDIT TO BUY THINGS YOU CAN'T AFFORD plug). Anyway, as you can see in this picture, we don't have matching counter tops. We've been meaning to replace them for a long time, but it's one of those things you live with and actually forget about until you're reminded, oh right, matching countertops do look nice...


So there it is, a quick look back at 2011 and a small look into some ideas for 2012. Hopefully this year will be just as productive as last and we can continue to share it with you all. Thanks for reading!

Tuesday, December 20, 2011

Last Minute Decorating

If you're like us, you've had your Christmas decorations up since the day after Thanksgiving, however, if you are one of those people that wait to do things until the last minute (ahem, like me writing this post 5 days before Christmas..) then we may have a few quick decorating ideas for you. The first idea is my favorite new decoration for the year. It's our new wreath for the front door.


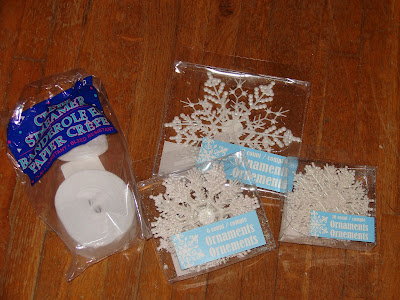
I got the idea from my pinterest page, but it was originally from here. I tweaked it a little bit though. I went to the dollar store and picked up these packages of snowflakes in three different sizes, as well as a white party streamer.


I picked up an inexpensive straw wreath from Michael's, and wrapped the streamer around it (leaving the plastic wrap over the straw part of the wreath to make it a little smoother). That took about five minutes. Next I heated up the trusty old hot glue gun and got to gluing. The snowflakes has a pretty good spot in the center to put the glue, so I just layered the snowflakes in varying sizes around the wreath. We decided the wreath was still lacking something though, so I used the strings that were already attached to the snowflakes to hang a few of them from the flakes that had been glued onto the wreath, in order to add a little depth and interest.


And there you have it, a simple, quick wreath to hang on your door or in your windows for Christmas, and you could even have this out longer for more of the winter since it doesn't have anything inherently Christmas-y about it.


Now for a quick look at tree decorating. Something that I like to do is to hang some ornaments on the inside of the tree, not just on the outer edges. They don't jump out at you, they just show through enough that you see a little shimmer and layering to your tree. To do this you have to make sure it's ornaments that are a little shinier or colorful to make sure that they show up enough and that you don't lose them when you're taking the tree down though. I like to throw some red and gold ones in towards the center of the tree. You can kind of see what I mean in the picture below, although sadly, it doesn't do it justice to real life.


And here's a look at our whole Christmas tree all lit up and even with a few presents underneath. 


One of our friends told us that whenever she sees the ornaments inside the tree like that it always reminds her of the Chip and Dale Chipmunk Christmas special where they're running through the tree. We're definitely cool with that though, it brings a little nostalgia to the tree.  


So there you have it, a simple last minute project, and a new way to consider decorating your tree. Anyone else made any decorations for Christmas this year? Or maybe have chipmunks running a muck in your tree. We're considering trying to find a fun little chipmunk ornament to stick in the tree, just for the fun of it. 

Monday, September 26, 2011

Circle Gets the Square

For quite a while now we've been thinking about getting rid of our old coffee table for something a little more modern that would be more kid friendly at the same time (no this is not any sort of "we're having a baby" announcement, we have 6 nieces and nephews that are over a lot, so we like to keep things pretty kid friendly for them). We had been eying this ottoman from Target for a while.
It's just so great, has a place for storage, and even a hard top on the opposite side of the top to make a table top, but the $170 price tag had us cringing, so we hadn't ever really looked at it too closely, other than the fact that I neurotically checked to see if it was on sale every time I went into Target. Well, the ottoman didn't go on sale, but we had a garage sale, and decided before hand that the money we made could go to buying the new ottoman. We actually went to buy it before the garage sale even happened just in case we didn't like it and wanted to keep our current coffee table (which we planned to sell in the garage sale). But of course we knew we would love the round one, the shape would make the flow from the living room to the kitchen so much better, and all that storage, how could we not...(this is what they call foreshadowing in literature). So we went out and bought the ottoman, confident that it would be great in it's new home. And then, it wasn't.
 It wasn't horrible, it just wasn't as great as we were hoping, it kind of felt too small and too big for the space at the same time somehow. See how it almost cuts off the walkway between the chair and couch?
So, seeing that the round one may not be quite right for us, we decided to go back and check out some square ones we had looked at while we were there too. (I couldn't find the exact ottoman on the Target website, but it's pretty much like this only without the legs.)
They were listed at $70, which would only be saving us $30, so when we thought we liked the round one so much better it didn't really seem worth the savings when we liked the round one more. But since we weren't as enamored with the round one as we thought we would be we decided to go back and get a couple of the square ones to see what we thought of them. We kept the round one too though, just in case we did end up liking it better still. So, off on another trip to Target (good thing it's only a few blocks from our house). We weren't terribly excited at the prospect of spending $70 a piece on the little square ottomans, but we thought we should give them a chance. When we checked out at Target though, we discovered that they were on sale for $51 a piece! That definitely made us like them a little more. So we happily came home with our two square ottomans, which with our Target debit card's 5% off plus another 5% off coupon we had, cost us just $100.39. Let me tell you, the extra $30 in savings may not have been that much of an incentive to us, but an extra $70 is definitely a good one for us. So we moved the round ottoman out of the way and set up the two square ones.
We immediately liked the look of the two square ones better, plus the extra $70 that we would be saving on them was still in the back of our minds helping us decide. We decided to keep both overnight though to think on it before making any rash decisions. We even set up the round one again so that we could wake up to it and see again what we thought of it. The next morning we still weren't feeling the round one though, so back it went that afternoon and we haven't looked back. We really love the square ottomans, and we really like the tray option that they have. We still haven't decided what we're going to store in them, but I'm ok with having storage space that's just free whenever we decide we need it. And they look so great in the space. Here's a look at the transformation from old coffee table to round ottoman to square ottomans. 
The square ones just seem to fit so well, plus since we plan to sell the old coffee table, along with a matching end table on Craigslist and if we're lucky we may come out right around even for the cost to buy vs. selling price. Not a bad deal for such an updated look that's more efficient (since they each have storage and are much more comfortable to rest your feet on than the old coffee table was) and they're more kid friendly! It's a win, win, win!
Anyone else out there gotten a much more updated coffee table situation lately? Or maybe made another trade off that you feel like you got the better end of the deal on?


Monday, September 12, 2011

Have I Mentioned?

Have I ever mentioned how much I love Target? I probably love it a little too much, and since it's only a few blocks from our house, I frequent on a very regular basis. We're talking it's a very strange week if I haven't been there, and I'm usually there multiple times a week.

So why am I telling you about my Target addiction today? Well, there is an upside to my obsession, I see pretty much everything in the store and know when there is new stuff and when there is stuff that has gone on clearance. One of my most recent finds were the curtains I got for the back room.  I managed to snag them for only $7/panel, which is quite the steal. Update: I just went to Target again this weekend and they are now on clearance for $4 at our store.
As I mentioned here I had already bought the curtains, but was just waiting to get the rods. Well I went to Big Lots (another favorite place, especially for curtain rods) and got some finally. So up went the curtains.
 We hung them as close as we could to the ceiling while still having them graze the floor. (I can't stand too short curtains, it's like those people who wear too short of pants, it just doesn't look right). Having the curtains up higher draws the eye up and automatically makes the windows look just a hair bigger. Plus, since the ceiling in this room is only seven foot it helps to make it see just a little larger.
The one thing I love most about these curtains is their subtle diamond pattern. I think it really adds depth and dimension compared to a plain white sheer panel.

And I checked having them closed at night and they provide a surprising amount of privacy. You can see through them a little if you really concentrate, but hopefully we won't really have people standing outside trying to see through them that hard. If so then we have a whole other problem. And since we're curtain closers anyway it works out well for us (we don't really like to mess with the blinds every night, so we just close the curtains instead). They also do a great job of filtering the light in the day if we happen to leave them closed. Compare: Open:
Closed:
You may not be able to tell the best in the pictures, but the closed curtains kind of redistribute the light so that it brightens the whole room rather than having direct sun in some areas and then darker shadows in others.

We really like that we didn't have to spend very much to have great looking windows (because we're kind of cheap skates). In all we ended up paying $7/panel and bought six curtain panels, $7 for each of the two shorter curtain rods and $10 for the longer rod over the double windows. So in all we only spent $66 for the entire window treatments. Not too shabby considering that you can pay that for a single pair of curtains easily in a lot of stores.

Monday, August 22, 2011

Shelfish

Last week I mentioned that we might do some art over the dryer at some point. We may still do that, but it is looking much less bare these days thanks to a quick little shelf project we whipped up. We started out with some L brackets and a 4 foot pine board that we picked up at Lowes for $9.63.
We measured how long we wanted the shelves to be to fit perfectly in the corner. Then two quick cuts with a skill saw later we had this.
We also had a shorter piece of board left over, who knows, it may become a shelf somewhere else someday too. Next I primed and painted the boards (which you can see some in the above picture since I forgot to take a pic before I started priming). We decided to go with white shelves to match the trim in the room since we want them to look nice, but still kind of blend in with the rest of the room.
I started out painting one side and the edges, then waited for it to dry, which only took about 10 minutes since it was a hot day, and flipped them to paint the other side. I did one coat of primer and two thin, even coats of paint to get them looking nice.
Now all we had to do was hang them up. Jake used a level to line the L brackets up so that the shelves would sit on them nice and straight, then he just screwed them into the wall.
Jake also secured the shelves to the L brackets using screws. I'll probably go over the heads of the screws with a little white paint at some point to make them a little less noticeable, but for now I'm really loving what those shelves have done for the corner. As a refresher, here's what it looked like before. 
And here's how it looks with the newly added shelves. 
I love how cute they look and all that added function that they provide to the laundry area. And since we already had the primer, paint and screws on hand, the entire cost for the shelves was only the $9.63 we paid for the brackets and board! Gotta love an inexpensive, functional and cute fix! 

Anyone else made any simple improvements that you didn't realize how much you would love until you finished it? I know every time I walk in the back door I look up in that corner and smile now.

Tuesday, August 16, 2011

The Big Reveal (Finally)

So this is a lot longer in coming than I originally expected it would be, but I also never expected the worst tornado in 60 years to come barreling through my town, so I feel like I have a decent excuse for the tardiness of this post. First, let's take one more quick before look at the room.
Ugh, I'd kind of forgotten how ugly and not at all functional that room had been. Yikes! And now for the big reveal:
What do you think? We really love the way it turned out. It's so much more cheerful, and functional, and just plain nice to hang out in. I still love walking into it every day, it just looks so much better. And just so you all know, we did meet our deadline of finishing it by Memorial Day, I just didn't get around to getting it all blogged about until now. This is the view from the kitchen door.
There are still a few other things that we plan to do to the room, like add in some window treatments to the bare windows.
Add in some art on that ridiculously bare wall next to the kitchen door and even over the dryer potentially.
Maybe paint that other cabinet next to the gray one in the corner (please excuse the adorable blonde headed boy in this pic, also known as our nephew Blake).
Who knows, maybe someday we'll even refinish the floor, but all of those things are down lower on our list of things to do right now, but we'll definitely let you know about them if and when they happen (I actually already have the curtains for the room, just need to get some good looking rods). Right now though, we're just basking in the glorious remodel and loving it. We've had people over several times already to use the dining area of the room.
And the laundry area is so much more functional now than before (you can see the awkward washer/dryer situation in the before pic at the top of the post).
I think my favorite thing, well, I'm not sure I can say that, because I love pretty much everything about this room, but one of the reasons I love it so much too is because of the gallery wall.
We'll go into more detail about the gallery wall and the laundry nook, as well as a few other projects that helped bring this room together, at a later date, but we just couldn't wait anymore to show the final pictures. We just love the way the room turned out!

Anyone else finished off an previously hideous room in your house that is now one of your favorite places? Or is there anyone inspired to do a little paneling painting now?

And if you're interested in checking out the rest of the room projects, and the step by step tutorials that we did, here's a list of them:

Here's a look at all the before pictures.
See how we took down the tile ceiling.
Check out the difference that lighting can make.
How to put up sheet rock.
Preparation for painting paneling by caulking holes.
How to texture drywall.
Put up new paneling over existing "walls".
How to prime wood paneling.
Painting wood paneling with Drifting Dune.
How to paint wood trim and molding.
Adding more of the color you love to your house with another blue door.
How to add art to closet doors while keeping them functional.

Saturday, July 30, 2011

Decal-in' It Up

Remember the decal we got in this post? Well it's finally being put to good use. We mentioned in the aforementioned post that it would most likely be used in some form or fashion on the giant sliding doors in the back room. The doors take up most of a wall, so it just seemed a shame to not be able to display any art on them (please ignore the mess on the floor and table, and the fact that the windows aren't painted yet in this picture).

Enter decal. We mentioned when we first wrote about the it that we weren't sure if we would actually use the actual decal or use it more as a stencil to paint with a similar but slightly different color as the rest of the room onto the doors. But when Jake looked at it more closely he decided that stenciling would not work out the best. You can kind of see why in the picture below. 

Not the best stencil material. But, we really liked the colors of the actual decal anyway, so it wasn't a loss. Jake was the one who put the decal up since he's good at detailed stuff (I don't have enough patience). He also decided that trying to follow the picture from the packaging exactly would be too much of a hassle, and most likely somewhat impossible, so he just winged it (no bird pun intended, sometimes these things just happen). Here's an in progress shot. 

We both really love the result, and several people that have seen it thought that it was painted onto the doors, I almost hate to admit to them that it's actually a decal. Every time I kind of want to put my thumbs in my pockets, puff my chest out and say, "Yeah, we're just awesome like that", but I've refrained, so far that is. 

And here's a quick look at both doors, proudly showing their plumage (ok, I may be taking the bird thing a little far now).

And while we're on the subject of the closet doors, here's a quick switcheroo we did in less than 5 minutes one night. The old pulls on the the doors were gold. 

It's hard to tell the color in the picture a little bit, but trust me it was gold, and gold isn't really our thing. So we decided to switch them out for silver ones. 

It may not be the biggest change in the world, but sometimes its all in the details, and we definitely like these details better than the former details. Here's a close up of the nice, shiny, new pull. 

It may not really be your jam, but we like the subtle difference it made on the doors, somehow they felt cleaner and more streamlined. 

Anyone else added a decal recently, or maybe made a very subtle change to something in your home? Do tell!